

How I made my Alphonse Mucha "Reverie" or "Daydream" Halloween Costume from Scrap Fabric and Beads
- Christie
- Nov 4, 2021
- 12 min read
Introduction:
For at least 10 years now I've played with the idea of making this Halloween costume. It took me a while to actually follow through on this musing - mostly because I figured it was a really niche costume that most people wouldn't get without the reference. Also I was intimidated by it, to be frank. There is a lot of detail that I really wanted to get right.
This year, though, I decided I didn't care if people didn't understand what my costume depicted, and I also gathered the courage to create something that I didn't even know how to start. I wanted to do it, so I did. :)
Alphonse Mucha is a Czech Art Nouveau painter whos paintings span from 1868 to 1938. He's known best - at least by me - for his paintings of women wearing drapey gowns. I especially love the headpieces, chest pieces, and little details that he paints on the women in his paintings, as well as the soft colors and shapes that he uses.
The Painting:
One of my favorite paintings by Alphonse Mucha is entitled "Daydream" or "Reverie" which was done in 1896. It is also the cover of a Barnes and Noble book that I picked up not very long ago. This is the image I ultimately decided to replicate for my Halloween costume.

The Fashion:
One thing that I notice in looking at Mucha's art is that the fashion that the women wear in his paintings does not match what was typically worn during the time period he painted in. Womens clothing in the 1900s tended to be much more structured - Alphonse Mucha painted his models wearing much more drapey clothing with very theatrical accessories.
I did some research on the specific style that Mucha seems to paint on his models and found that many of them seemed to replicate Byzantine fashion. I went down a bit of a rabbit hole and looked up more recent examples of this era being referenced in the modern day. The Chanel Paris Pre-Fall 2010/2011 fashion show was one that I saw that provided a bit of inspiration for this project.

Starting the Design:
Before I started working on this costume, I honestly had no idea how I would go about replicating this design - I knew that I could easily find a drapey dress that would work. I ultimately ended up using the Doen Eclipse nightgown for my iteration. It was the chest piece that I didn't know how to make. I couldn't find any information on how these were made historically, but my guess was that it would've been made with some kind of lightweight metal. I am not a metalsmith, so I decided that I would need to work with what I knew - which was fabric.
How I Made It:
Supplies:
Gold Chain
Wire cutters
Different sized sewing needles (From thick to beading needles)
Clear plastic thread
1 1/2 Inch Ribbon
Fabric in different colors
Metal Embellishments
A bunch of different types of beads (some new, some repurposed from vintage jewelry)
Sequins
Gold Embroidery Thread
Plastic Pearl Strands
Tracing Paper
A computer & Resizing software
Felt
An exacto knife
Gold Fabric Paint
Old overhead projector sheets (thick clear plastic also works)
Fake Flowers
Metal headband
Floral Wire
Ribbon that matches hair color
Glue Gun
Glue Sticks
Step 1: Making the Chest Piece:
One of my goals was to make the chest piece as close to the same dimensions as possible to match the illustration. For this, I started by finding the art image online and uploading it into a program where I could enlarge it (keeping the dimensions) and printing it as a PDF to match the proportions. For this process, I used Adobe Indesign.
After this, I traced the basic shapes onto a piece of tracing paper, then cut a piece of cream toned felt to the size of the whole chest piece and transferred the design onto the felt. I chose felt because I planned on making the chest piece almost exclusively out of beads and needed a fabric that was heavy duty enough to hold up to the weight but would also drape nicely on the body when complete.
Using a pen, I traced the basic shapes from the tracing paper onto the felt, and began quilting with scrap fabric onto it. Below is a shot of the first color I used which was gold. This was sewn on by hand.

I blocked out the basic colors using different colors of fabric, sewing each piece down. In the image below you can see the different fabric quilting I did, as well as the start of my beading work. The beading was done using different techniques - Some of the beads had holes that were large enough to use traditional sewing needles to sew on. These were the easiest to work with. Others had tiny holes that only a beading needle could be used with - For those, I had to work almost exclusively on the outside of the chest piece since the beading needle wasn't strong enough to get through all the fabric. For all of the beading I used plastic thread.
If I had to do this part again, I would make sure to choose beads with holes large enough to use with a regular sewing needle.

As you can see, this piece is not an exact replica. I don't know that it would be possible to make an exact replica, and I don't think that should be the goal. Instead, I did my best to find beads in similar colors and sizes and used what I could find. I think that having a mix of vintage and new beads does give the desired effect, though.
The underside of this chest piece was left unfinished - Underneath is a mass of plastic thread and raw felt, and many knots that hold the beads in place - If I wanted to I could iron one a one-sided fusible stabilizer to the back to ensure that I don't accidentally catch one of the threads, but I haven't done that yet, and probably won't unless I wear it for a long stretch of time.
Step 2: Making the Ribbon Piece & Stenciling the Top of the Chest Piece:
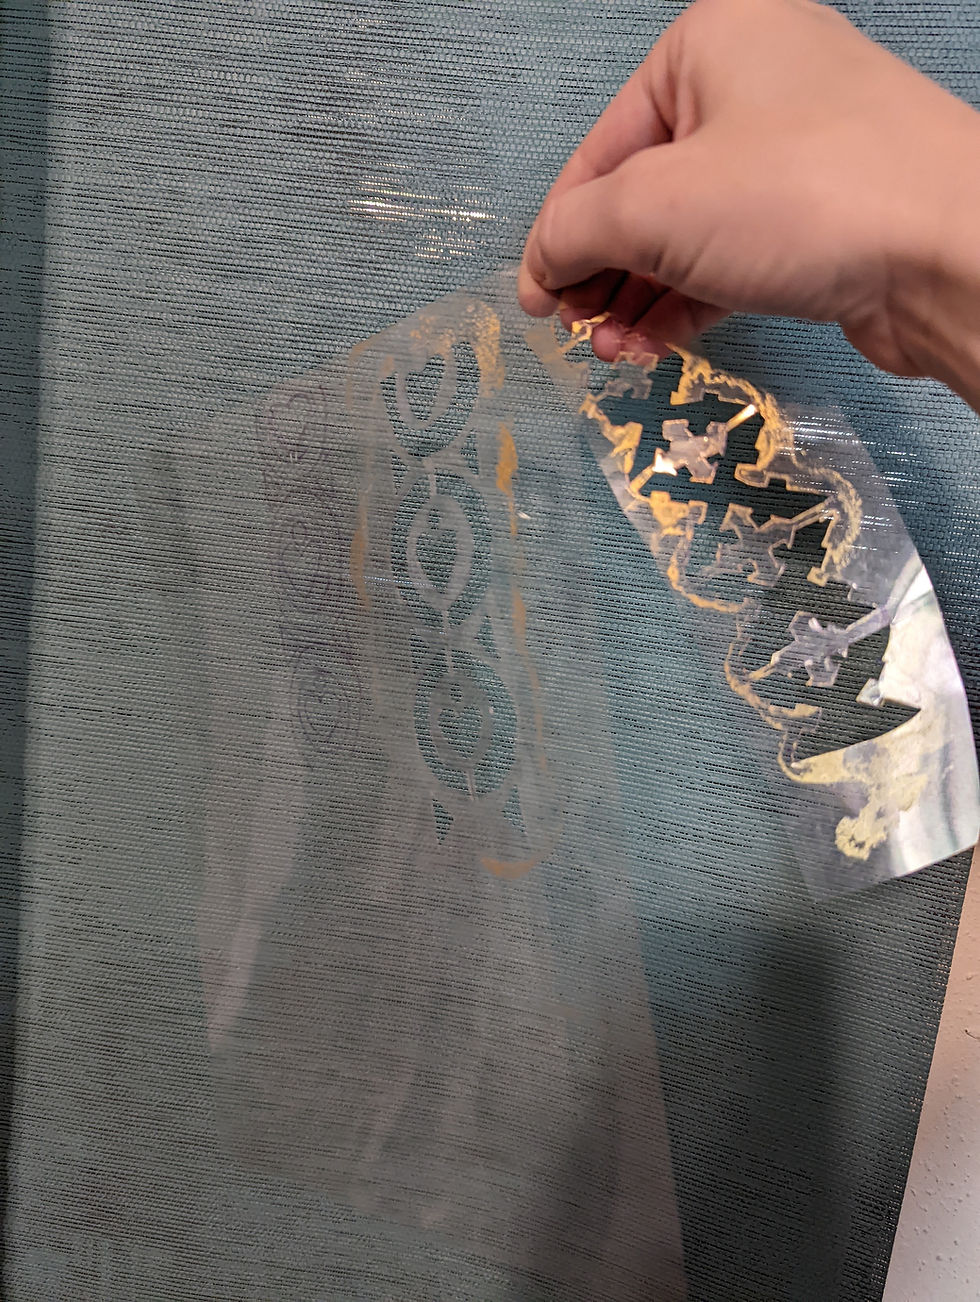
After that, I decided to work on the ribbon and top portion. I did try to find a ribbon that would work with a similar pattern already printed on it- even going so far as to check Etsy for something that would work, but most of the options would've needed to ship from India and would've take too long to get to me. Using my trusty motto "use what you have", I decided to make my own stencil and paint the base design on myself
For the stenciling process, I used the image I blew up from in-design to make a proportional image of the design. I then printed out the PDF and traced the image onto some old projector sheets that I got for free when they were going to be thrown away. any clear sturdy plastic would work for this step, though.
I used an exacto knife to cut out the design as precisely as I could, going over the lines I traced to make the stencil. Below is a picture of my used stencils. The one on the left was used for the long ribbon down the front, and the one on the right was used for the very top (blue portion) of the chest piece.
I used these pieces to very carefully stencil these sections gold.
Below is a really blurry shot of the ribbon after I finished stenciling it and before I began adding beads and sequins to it - It is not perfect, but the process worked well enough.

Once this portion was done, I sewed on the plastic pearl strands onto the edge of the ribbon all the way around. I'm really happy that I bought these strands - they were pretty quick to work with as opposed to making an extra long string of beads, plus I don't have to worry about accidentally breaking a strand of beads and having them all fall off. These are similar to the ones I used.
Before I began working on adding beads to the ribbon, I tested using rhinestones on it just to a small sample piece of stenciled ribbon. Unfortunately, the rhinestones didn't adhere as securely as I would've liked, so I decided to sew beads on instead of gluing on rhinestones.
To put the beads and sequins on the ribbon, I used the same technique I used with the chest piece - Using clear plastic thread to sew on the beads and sequins. It did end up warping the ribbon just a bit, but I'm happy enough with it. Once this was done, I sewed it onto the the underside of the chest piece using the clear plastic thread.
Step 3: Making the Backpiece:
To be honest, I didn't initially plan to make a backpiece. I thought that I would only need to make the front chest piece, tack it on, and then tack the chains onto the back of the nightgown. What I found out when doing a fitting was that the chest piece needed a counterweight, and that the piece was more than likely worn over the dress (similar to a necklace) as opposed to being a part of the dress itself. This was a bit of a breakthrough for me - I started seeing this piece as more of a necklace as opposed to a design detail on part of a dress.
Unfortunately, I found this about 2-3 days before I was supposed to wear it, so I ended up making the backpiece smaller than I would've liked.
I used the same technique to make the backpieces as I did with the front piece, except that I used only one piece of fabric instead of color blocking onto the remaining felt I had, and I just kind of winged it on the design with the beads and placement. In a lot of cases I was running low on the beads I needed, so for this I used what I had left over. I tried to use my heavier beads to use as a counterweight, and hoped that it would help prevent the dress from pulling down in the front.
Below you can see the two completed pieces side by side. The one on top is the back piece.
The one underneath is the chest piece. I wish I could've made the back piece almost the same size as the chest piece but you do what you've got to do. :)

Step 4: Adding the Chain Shoulder Straps:
This part was a bit tricky, I have to admit and did require an extra set of hands - I ended up needing to get my husband's help to measure roughly how much chain I would need. Even after that, I ended up needing to bend a few of the chains and add in more chain links to make it fit right. Even then I think it's just a bit tighter than I'd have liked.
To attach the chains to the chest and back pieces, I used that same plastic thread and attached them to the back of each piece making multiple knots to ensure that even if one came undone, there'd be others to keep the chains attached. There is almost definitely a more secure way to attach the chains, but I didn't have time to figure that out since I was attaching chains the day before I was supposed to wear the costume.
Something surprising that I discovered with this piece with all the chains attached was that it did indeed hold itself up even when worn off the shoulder - I'm so used to seeing my body from the front that I wasn't sure if my mostly squared shoulders would keep the piece up. I guess it really shouldn't be surprising, but the width of your body over the shoulders does get broader all the way around even if you have square or even willowy shoulders from the front. The fact that I doubted this is kind of funny to me now, in retrospect. :) If you make the chains tight enough, the piece will stay up on its own, even if it's made to be off the shoulder as it's painted in Mucha's illustration.
Step 5: Attaching the piece to the nightgown:
Even though it did hold itself up, though, I did need to tack it down onto the nightgown in order for it to match the illustration more, especially in the back since the back of the nightgown sits low while the back piece sat higher on my back. Also, the front would've been pulled down a bit due to the weight in the back being a bit too lightweight in comparison. Tacking it down would negate this issue.
Due to the delicacy of the fabric on my particular garment, I made sure to tack the front and back down as minimally as possible, and tacked it to the strongest points which, in this case, was to the part with elastic. For the front piece, I tacked it in 5 different places using the same clear thread I used for beading. I used just enough so that it didn't pull very hard on any one spot, but as little as possible so that I didn't risk damaging the very thin fabric. The back piece was done in a similar way, and I used it to pull the back of the nightgown up so that it was hidden underneath the backpiece.
From there, I put this gown on as carefully as possible, and also take care when removing it to avoid these pieces pulling at the gown and damaging it.
These tacks are made to be removed with scissors so that the nightgown can function again as a regular nightgown. If I wanted to wear this costume again, I would simply redo the tacking in the same way.


Step 6: Making the Headpiece:
This was definitely the easiest and quickest part of the costume to make. Using a metal headband as a base, I attached peach toned flowers to it using floral wire and a hot glue gun to secure as needed. I grouped the flowers to resemble how they looked in the illustration. After everything was set up the way I liked, I carefully wrapped gold ribbon over the floral wire so that it blended into my haircolor a bit more.
There are different techniques you can use to get a similar result. I didn't start off this project thinking of this headpiece as a flower crown, but it's basically a flower crown. This video on youtube by Wonderlust is short and informational. You can use that technique for a similar end result without needing a metal headband - Also I think her way is easier to do.

Step 7: Hair & Makeup:
I really only did this step for the photos, but the makeup I used to mimic the illustration was mostly neutral tones on the eyes with darker brown shades focused on the outer portions and into the eye crease. I used black eyeliner to match the illustration, and did a slight wing, but made sure to not angle it upwards since the models eyes are more down turned (not lifted looking on the outer corner). In the illustration, she wears dark red lipstick. I don't have quite the same shade and used a cooler toned lipstick, but it gives a similar affect.
For the hair, I simply curled my hair and pinned some of it up one one side with bobby pins keeping the other side loose. Honestly, with the way I did this it wouldn't have lasted more than 15 minutes before it all fell down - It was already coming loose while I was taking these photos, but I think this would also work great with mostly unstyled hair as well. I ended up just wearing it curled for the little get-together we had. I also kept the eye makeup on, but took the lipstick off because eating and dark lipstick don't mix well. :)
Closing Thoughts:
Overall, I am very happy with how this costume came out, and I'm so happy that I was finally able to make it happen. I also learned that I really love making things like this, and already bought some beads to use for a similar future project of my own design. The process itself of sewing on the beads and color blocking the fabric onto the felt was similar to the process of embroidery and I found it really calming and relaxing to do, despite the fact that I started this project more last-minute than I probably should have.
I'm also really excited to have learned how to make a wearable accessory. Next time, I might try making something that is more durable and that fits into my own modern wardrobe as an accessory that I could wear out. It's almost like a modular piece that you can add onto a dress to transform it into something completely different and new, and I really love that idea. If the backpiece was a similar weight and if the dress didn't need to be adjusted, this piece could've easily been slipped on without needing any tacking.
Not including the time that it took to find the beads, the actual time I spent on construction and putting this all together was between 30 and 50 hours, I'd say, although I didn't time myself. It does take a long time to make things like this, and although it did cross my mind to list similar items on Etsy, I realize that due to the amount of labor and the price of the materials, the end product would be way out of many people's price range so I don't plan on selling items this elaborate anytime soon.
If I had to nit-pick this project a bit, I do wish that I could've found a better option for the little 3 piece heart parts on the ribbon instead of sequins - I used sequins because that was the only option I could find that didn't look completely weird. The little red and blue bunches of beads at the top of the chest piece also would look much nicer if they were single beads, but that size was surprisingly difficult to find on short notice.
This is definitely my favorite Halloween costume I've ever worn, even though I know I will probably need to explain it to 98% of the general population in order for people to understand it, but then again I would get to talk about one of my favorite artists, so we'll just call that a win. :)


Anyway, thanks for reading my post if you got this far. I hope that this inspires you to either be a pretty Mucha painting, or it inspires you to make something even if you don't quite know how to do it from the start. You never know how it will go, and you may just end up with something beautiful in the end.
Comments